Chana kurma recipe a rich hotel style kurma made in one pot.

Chana kurma recipe with step by step pictures and video.Easy chana kurma recipe perfect to go with roti, jeera, rice, pulao,parotta etc.
I first tasted this kurma at my sil’s place in Chennai and loved it so much.She made it with black chana and it was soo good.So asked her the recipe, came back to Coimbatore and immediately tried it.It came out good but was not tasting the same as hers , something was missing.Though everyone at home loved it, I was still looking for that exact taste.In that process I started improvising the recipe and that’s how this hotel style channa kurma recipe came into existence.Hotel style kurma is thickish, rich and creamy.
I have tasted kurma at Saravana Bhavan,Adyar Ananda Bhavan,Annapoorna etc but I usually find the whole garam masala flavours a bit dominating so mostly stick with usual poori masala combo.So I was on the look out for a perfect kurma that would suit both my tastebuds and mittus.As mittu recently has started to love hotel kurmas very much,I am so happy that this kurma has become her most favorite now.And am relieved atleast she has another favorite sidedish for chapathi apart from the regular PB masala.

I have made this kurma several times for parties, to serve for guests and this kurma has gaained me so much of appreciations and when I shared a pic of mittus bday party dinner in Insta, many readers asked for the chana kurma recipe and finally here it is.
Variations:
- You can replace half and half of fried gram dal with cashews if you are looking for a diet friendly kurma.
- Also you can add 1/4 cup coconut instead of 1/2 cup coconut and add more of fried gram dal say 2 to 3 tbsp.
- Adding kasoori methi at the end gives a nice flavour.

If you have any more questions do mail me at sharmispassions@gmail.com
Follow me on Instagram, Facebook, Pinterest ,Youtube and Twitter .
Tried this recipe? Do let me know how you liked it.Tag us on Instagram @sharmispassions and hash tag it on #sharmispassions.
Chana kurma recipe
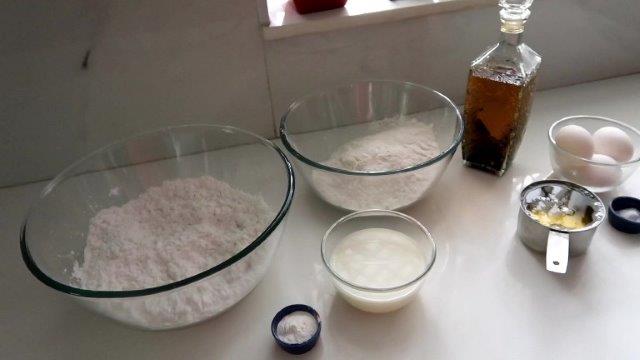
Ingredients
- 1 cup chana
- 1 cup onion finely chopped
- 1/2 cup tomato roughly chopped
- 1/4 tsp turmeric powder
- 1 tsp red chilli powder
- 1/2 tsp coriander powder
- 1/2 tsp garam masala powder
- 1 tsp ginger garlic paste
- 1 tbsp coriander leaves
- 1 tsp kasoori methi
- salt to taste
- water as needed
To temper:
- 2 tbsp oil
- one 1/4 inch cinnamon
- 1 small clove
- 1 small cardamom
- 1 small star anise
- few nos curry leaves
To grind together:
- 1/2 cup coconut
- 1/2 inch piece ginger
- 1 small cardamom
- 1/4 inch cinnamon
- 1 small clove
- 1 small garlic
- 1/2 tsp cumin seeds
- 1 tsp fennel seeds
- 10 nos pepper
- 1 no green chilli
- 10 nos cashews
Instructions
-
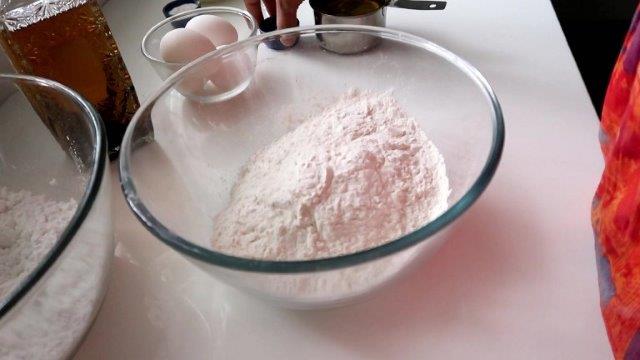
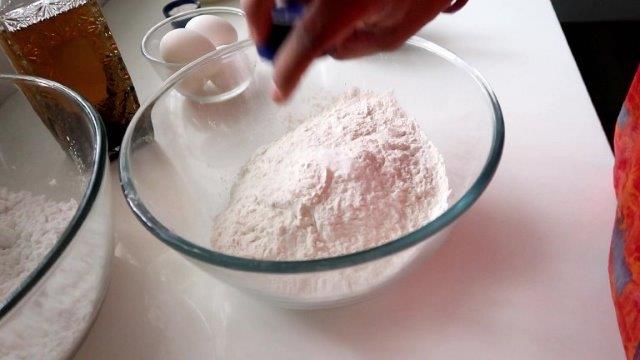
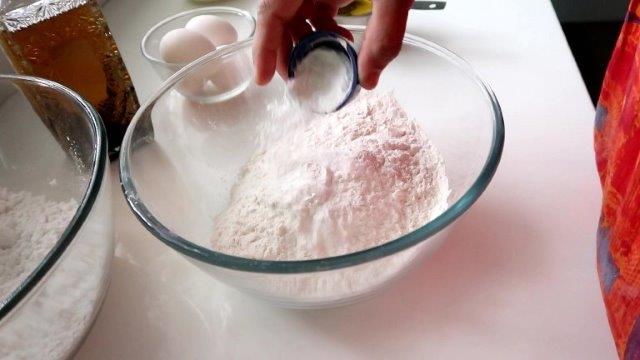
Soak chana overnight, pressure cook along with enough water for 5 whistles.
-
Chana should be soft but not mushy.First to a mixer jar - add all the ingredients listed under 'to grind together' along with little water, grind to a paste, set aside.
-
To a pot - heat oil add items listed under 'to temper' let it splutter.Then add onion,salt, ginger garlic paste.Saute until golden.
-
Then add tomato, saute until mushy and raw smell leaves.Add turmeric,red chilli,coriander and garam masala powders.Give a quick saute then add coconut paste.
-
Mix well, add 1 cup water.Mix well.Slightly mash chana here and there, do not overdo.
-
Cook covered for around 10 mins or until oil floats on top.Garnish with coriander leaves,kasoori methi.Give a quick mix and switch off.
Notes
- Adjust spice level according to your taste.This is mildy spicy suitable for kids too.
- Make sure chana is cooked soft else it will not blend well with kurma well.
- Do not skip cashews it adds richness and thickness to the kurma.
Hotel Style Chana Kurma Video
Method:
- Soak chana overnight, pressure cook along with enough water for 5 whistles.
- Chana should be soft but not mushy.First to a mixer jar – add all the ingredients listed under ‘to grind together’ along with little water, grind to a paste, set aside.
- To a pot – heat oil add items listed under ‘to temper’ let it splutter.Then add onion,salt, ginger garlic paste.Saute until golden.
- Then add tomato, saute until mushy and raw smell leaves.Add turmeric,red chilli,coriander and garam masala powders.Give a quick saute then add coconut paste.
- Mix well, add 1 cup water.Mix well.Slightly mash chana here and there, do not overdo.
- Cook covered for around 10 mins or until oil floats on top.Garnish with coriander leaves,kasoori methi.Give a quick mix and switch off.
- Serve hot with chapathi,pulao etc.


My tips while making chana kurma recipe:
- Adjust spice level according to your taste.This is mildy spicy suitable for kids too.
- Make sure chana is cooked soft else it will not blend well with kurma well.
- Do not skip cashews it adds richness and thickness to the kurma.

The post Chana kurma recipe | Hotel style channa kurma recipe appeared first on Sharmis Passions.
from Sharmis Passions https://ift.tt/34LJKvE
via KITCHEN MASALA
 IMAGE SOURCE: Pexels.com


 Wishing all my follower friends a Very Happy Onam


 If you have any questions not covered in this post and if you need help, leave me a comment or mail me @aarthi198689@gmail.com and I’ll help as soon as I can.