“Delicious fluffy strawberry muffins which is fluffy vanilla flavoured cake with dots of strawberries all over it. These strawberry cupcakes or muffins is perfect to serve for breakfast” Strawberry muffins are my favourite. I can easily make these muffins in just few minutes. You need just a handful of ingredients to make this muffins. You...
Avocado crema with simple ingredients available at pantry. No sour cream, spicy dip with few bullet chillis. Step by step photos.
I love avocado without it’s texture. Somehow still I have not developed taste for avocado. Though it’s healthy and I get it here effortlessly, not including in my diet. But I am okay when I have it as spread or in a salad in ground form.
Last weekend we had a nachos dinner after seeing a video from epicurious. I knew I am going to post avocado crema the as soon as I saw it. Besides, the name itself is very tempting right? So I hacked the recipe with couple of ingredients and tried.
One is sour cream. I replaced it with hung curd as all sour cream available here has gelatine in it. Two used few bullet chillies to spice it up and suit our taste buds.
Subscribel to my blog new post in your Inbox.
How to choose Avocado:
Choose blackish dark green skinned avocado. Neither too green nor too black. Big no for soft avocado as it may have gone bad in the inside, you can’t be sure. So go for the firm and in-between one in colour. If you are making the next day, leave it in counter top. If it could take couple of days, then you should refrigerate.
Just blend ripe avocado, hung curd, cilantro, green chilli, lemon juice, salt and a splash of milk to adjust consistency.
Ingredients swap:
If you are okay with sour cream you can save some time that preparing hung curd. Black pepper can be used instead of green chilli.
Storage/ Shelf life
It can be stored up to 2 days in fridge. To avoid browning, you should make sure you store in an airtight container. Tap gently and level the surface. Use a cling wrap to cover the surface of avocado. This prevents browning/ discoloration.
Place a metal strainer over a bowl. Line it with clean kitchen towel.
Measure 1 cup of curd and pour over the cloth. Gather the ends and hand over the sink. I tied over my tap.
After minium 1 hour, gently squeeze of excess water. Or you may choose to hang for longer.
You have thick hung curd now to use in place of sour cream.
Run the knife along the avocado until you reach the seed. Refer this video to see how.
Take out the seed. Scoop the avocado.Place it in blender with roughly chopped coriander leaves.
Add green chilli, lemon juice and salt to it. Along with hung curd.
Blend well smoothly. Wipe the blender walls in between twice or thrice for even smoothness.
Transfer to serving bowl.
Notes
Choose perfect rip avocado to avoid bitterness.
It is important to use generous lime juice to balance the taste. Otherwise the avocado’s smell will be dominating.
You can add the zest of lime too if you want it to smell more limey.
Avocado crema method:
How to make hung curd: Place a metal strainer over a bowl. Line it with clean kitchen towel. Measure 1 cup of curd and pour over the cloth. Gather the ends and hand over the sink. I tied over my tap.
After minimum 1 hour, gently squeeze of excess water. Or you may choose to hang for longer. You have thick hung curd now to use in place of sour cream.
Run the knife along the avocado until you reach the seed. Refer this video to see how. Take out the seed. Scoop the avocado.
Place it in blender with roughly chopped coriander leaves.
Add green chilli, lemon juice and salt to it. Add milk along with hung curd. Blend well smoothly. Wipe the blender walls in between twice or thrice for even smoothness. Transfer to serving bowl.
Note:
Choose perfect rip avocado to avoid bitterness.
It is important to use generous lime juice to balance the taste. Otherwise the avocado’s smell will be dominating.
You can add the zest of lime too if you want it to smell more limey.
Serve with nacho chips or use it in your burrito, salad etc. You can also simple make Avocado toast by spreading this lavishly over a toast.
Bournvita milkshake a quick creamy milkshake with easily available ingredients in your pantry.
Bournvita milkshake recipe with step by step pictures and video. A quick tasty milkshake that can be made under 10 mins if you have all the ingredients ready.
I had leftover bournvita after making bournvita burfi so wanted to try recipes using it. Kids have been used to have canesugar milk, I am hesitant to again start it on a daily basis. I have few recipes on list to try using bournvita so hence stay tuned.
As bournvita flavour is loved by all, you will fall for this milkshake especially kids.
About bournvita milkshake recipe:
Frozen milk: Boil milk well, cool down completely then transfer to a bowl with lid and freeze it until firm or overnight. Frozen milk helps in giving creamy texture to the milkshake without addiing icecream.
Add the ingredients: Now to a mixer jar, add all the other ingredients namely milk, bournvita, chocolate spread, sugar, along together with frozen milk.
Blend: Now blend until smooth and creamy.
Serving & Storage:
Serve it with whipped cream which is optional however will add taste and zing to your milkshake. I topped up with chocolate sprinklers.
It keeps well in room temperature for 1 day however I would recommend to store it in fridge as it is good to have milkshake chilled.
If you have any more questions about this bournvita milkshake recipe do mail me at sharmispassions@gmail.com. In addition, follow me on Instagram, Facebook, Pinterest ,Youtube and Twitter .
Tried this bournvita milkshakerecipe? Do let me know how you liked it. Also tag us on Instagram @sharmispassions and hash tag it on #sharmispassions.
“Decadent Blender Chocolate Mousse Recipe with Step by Step Pictures. This easy peasy chocolate mousse is made using just few ingredients and taste absolutely delicious. “ Chocolate mousse is one of the most decadent and delicious recipe you could ever make. This taste so good and is super easy to make as well. Similar Recipes,...
Veppam poo thuvaiyal is easy to make, not too bitter if made in right way. Learn how to make perfectly balanced tasting veppam poo thuvaiyal.
I was looking at my freezer last week and had some veppam poo (Neem flower) that mom gave to me couple of years back. In addition to it, Vj without knowing it’s already there in freezer, bought a pack from shop.
We both love veppam poo rasam, so it’s fine even when we have more stock. For that reason, I wanted to finish the ones mom gave it to me. I was desperate to finish that stock as well as try something new for my blog post.
However, I had a huge doubt about the taste. I have already couple of times asked mom about the taste and how to make it. Again, last week pinged her asking about the recipe and taste. I told her if it is not tasting good, I will send her by courier. She was not at all bothered, she says she loves veppam poo thuvaiyal and she will happily eat it.
She kept pinging me how it tasted, but I actually just tasted, never had it that day. Next day also she pinged me asking about the taste. But when I had it, it was not at all bad as I thought. Vj too liked it. If you like veppam poo rasam then you will also love this thuvaiyal. Do try it.
What is the key in any of my thuvaiyal making? It’s to use more tamarind, balance spice and salt accordingly. Same applies to this too. Especially this neem flower have bitter taste right, so special care to add more tamarind and chilli to balance that taste. Also jaggery is a must for a rounded outcome.
Veppam poo thuvaiyal Summary
Dry roast veppam poo patiently in low heat until it starts to waft a pleasant smell. It will start to smoke as well as turn darker in colour.
Roast chilli in a tsp of oil. Saute tamarind to soften it.
Remove in a plate and cool down.
Grind with little water, salt and jaggery.
VARIATIONS
I have not experimented adding urad dal and coconut as in other thogayals. If I try, will update here.
I used spicy variety of chilli. If it is milder, use 12 chilli.
If you taste the thuvaiyal, it should taste slightly bitter, spicy and slightly tangy with a sweet taste. Any of these taste is dominating, it wont taste good. If it is bitter, it means likely you added less tamarind. Too tangy, then the spice is not enough. If it is too spicy, salt is not enough.
Step by step photos method:
Firstly, heat a heavy bottom pan. Once hot, add neem flower and roast in low flame patiently for 10 mins.
Remove in a plate. Wipe the pan and add oil. Roast chilli until it starts turning black here and there and crisp. Remove in plate for cooling. In the same pan, just saute the tamarind to soften it.
Once all the ingredients are cooled, place in a mixer jar. Finally, grind it with salt, jaggery and little water to a paste. It should be thick, not watery like chutney.
Serve with rice mixed with ghee and sutta appalam.
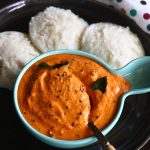
Tomato peanut chutney a great sidedish for idli, dosa, paniyaram, chapathi, oothapam, adai etc.This chutney goes very well with any type of main course.
Tomato peanut chutney recipe with step by step pictures and video. This is one of the spicy and creamy chutneys I’ve tried so far.
Chutney is one of the quite essential sidedishes we make to go with idli, dosa, paniyaram or even snacks like bajji, pakora etc. Sidedishes especially like chutneys on the side can make even any boring dish tasty.
This peanut chutney with tomato is inspired by a recipe which referred to andhra style chutney. I suddenly craved for a spicy sidedish so thought to try this. I did refer to few recipes but came up with this version to suit my tastebuds and preference.
The measures are very important in this chutney as you need to balance the tanginess as we are adding both tomatoes and tamarind.
About this tomato peanut chutney recipe:
To begin with first dry roast peanuts, dry chillies until golden brown – transfer to a plate, set aside. now add all other ingredients one by one like garlic, onion,tomato saute until mushy. Finally add the roasted peanuts, red chillies give a quick saute and switch off. Cool down completely then add salt along with little water then grind it to a fine paste. Add the tempered items to hot oil, let it crackle , add this tadka to the chutney. Adjust consistency by adding little water.
Serving and Storage:
This chutney goes well with idli, dosa, chapathi, paniyaram, oothapam , adai etc.
It keeps well in room temperature for 2 days as there is no coconut . However I would recommend to store it in fridge to extend the shelf life.
If you have any more questions about this tomato peanut chutney recipe do mail me at sharmispassions@gmail.com. In addition, follow me on Instagram, Facebook, Pinterest ,Youtube and Twitter .
Tried this tomato peanut chutney recipe? Do let me know how you liked it. Also tag us on Instagram @sharmispassions and hash tag it on #sharmispassions.
Tomato peanut chutney a great sidedish for idli, dosa, paniyaram, chapathi, oothapam, adai etc.This chutney goes very well with any type of main course.
CourseBreakfast, Side Dish
CuisineIndian
Prep Time10minutes
Cook Time15minutes
Total Time25minutes
Servings2
AuthorSharmilee J
Ingredients
1/4cuppeanuts
3nosred chillies
1tbspoil
2nosgarlic
5nossmall onion
2nos medium sizedtomatoes
salt to taste
water as needed
To temper:
2tspoil
1/2tspmustard seeds
1/4tspsplit urad dal
fewnoscurry leaves
apinchhing
Instructions
First to begin with dry roast peanuts and dry red chillies in low flame.
Dry roast until golden brown.
Transfer to a plate, set aside.
Heat oil in a pan - add garlic, small onion saute for a minute.
After that add tomatoes.
Saute until mushy, it takes 3-5 mins.
Now add tamarind, then already roasted peanuts, dry red chillies. Switch off.
Give a quick saute. Remove from flame and cool down completely.
Next transfer it to a mixer jar. Subsequently add required salt.
Add little water and grind it to a fine paste.
Finally for tadka : Heat oil in a pan - add the items listed under one by one to temper. Let it crackle,saute until dal turns golden.
Add this tadka to the chutney.
Give a quick mix. Add water if consistency is thick, so add little by little.
Adjust consistency according to your preference.
I served it with hot soft idlis..it was a yum breakfast.
Notes
I used peanuts without skin. If you use whole peanuts with skin, dry roast until brown spots appear here and there. Remove skin then proceed accordingly.
Adjust spice level according to ypur preference.Adding 3 chillies will give a bit spicy chutney.
Tomato peanut chutney recipe video
Step by step method to make tomato peanut chutney:
1. First to begin with dry roast peanuts and dry red chillies in low flame. 2.Dry roast until golden brown.3.Transfer to a plate, set aside.4.Heat oil in a pan – add garlic, small onion saute for a minute.5.After that add tomatoes.6.Saute until mushy, it takes 3-5 mins.7.Now add tamarind, then already roasted peanuts, dry red chillies. Switch off.8.Give a quick saute. Remove from flame and cool down completely.9.Next transfer it to a mixer jar. Subsequently add required salt.10.Add little water and grind it to a fine paste.11.Finally for tadka : Heat oil in a pan – add the items listed under one by one to temper. Let it crackle,saute until dal turns golden.12.Add this tadka to the chutney.13.Give a quick mix. Add water if consistency is thick, so add little by little.14.Adjust consistency according to your preference.
I served it with hot soft idlis..it was a yum breakfast.
My tips while making tomato peanut chutney:
I used peanuts without skin. If you use whole peanuts with skin, dry roast until brown spots appear here and there. Remove skin then proceed accordingly.
Adjust spice level according to ypur preference. Adding 3 chillies will give a bit spicy chutney.


 2.Dry roast until golden brown.
 3.Transfer to a plate, set aside.
 4.Heat oil in a pan – add garlic, small onion saute for a minute.
 5.After that add tomatoes.
 6.Saute until mushy, it takes 3-5 mins.
 7.Now add tamarind, then already roasted peanuts, dry red chillies. Switch off.
 8.Give a quick saute. Remove from flame and cool down completely.
 9.Next transfer it to a mixer jar. Subsequently add required salt.
 10.Add little water and grind it to a fine paste.
 11.Finally for tadka : Heat oil in a pan – add the items listed under one by one to temper. Let it crackle,saute until dal turns golden.
 12.Add this tadka to the chutney.
 13.Give a quick mix. Add water if consistency is thick, so add little by little.
 14.Adjust consistency according to your preference.


