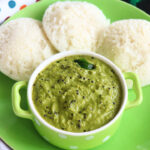
Pudina Chutney is a flavourful and aromatic chutney made with mint leaves, onion, garlic, green chillies, coconut etc. Pudina Chutney is a great sidedish with idli, dosa, uttapam etc. Mint Chutney or Pudina Chutney can be served along with snacks like bajji, bonda too. Let’s learn Pudina Chutney Recipe with step by step pictures and video.

Pudina Chutney shared here is the traditional version which serves as a great sidedish for idli, dosa and all other South Indian tiffin items.
About Pudina Chutney
Pudina Chutney is often confused with mint chutney or green chutney that is served along with chats and tandoori platter. I love that chutney too but this version is more authentic and flavourful with the addition of small onion and garlic.
This Pudina Chutney is made with a handful of easily available ingredients in your pantry and is quick to make too. This Pudina Chutney Recipe is from amma but her version slightly varies, I adjusted the ingredients and this has been my go to chutney whenever I buy a bunch of mint leaves or pudina.
Mint Leaves Benefits
- Mint is a flavourful herb which has many nutritional values and health benefits.
- Mint Leaves helps in digesting heavy foods.
- Mint Leaves can mask bad breath and odour.
- Mint leaves are a good source of iron.
Pudina Chutney Ingredients
- Mint Leaves – Use fresh mint leaves. You can clean mint leaves pluck the leaves from the stem and store in a clean dry box in the fridge. This way mint leaves stays fresh fro a longer time.
- Coconut – This chutney can be made without coconut also but increasing the other ingredients measure but I strongly recommend to add coconut. The addition of coconut elevates the taste of this chutney.
- Dals – Urad dal and chana dal are roasted and added to grind which gives a texture and taste to the chutney.
- Onion, Garlic – Small onion and garlic are added for more flavour. Using small onion is best, but if you don’t have you can use 1 medium sized big onion roughly chopped.
- Green chilli, Tamarind – Green chilli and tamarind are added to give spice and tanginess which gives a balance to this chutney.
- Tadka – A simple tadka using mustard seeds and curry leaves is added to hot oil spluttered then added to chutney at the final stage.

If you have any more questions about this Pudina Chutney Recipe do mail me at sharmispassions@gmail.com. In addition, follow me on Instagram, Facebook, Pinterest, Youtube and Twitter .
Tried this Pudina Chutney Recipe ? Do let me know how you liked it. Also tag us on Instagram @sharmispassions and hash tag it on #sharmispassions.
Pudina Chutney | Mint Chutney
Ingredients
- 1 tsp oil
- 1 tsp urad dal
- 1 tsp chana dal
- 8-10 nos small onion
- 3 big garlic
- 2 nos green chillies
- 2 cups mint leaves loosely packed
- 1/2 tsp tamarind
- 2 tbsp coconut
- salt to taste
- water as needed
To temper:
- 2 tsp oil
- 1 tsp mustard seeds
- few curry leaves
Instructions
-
Heat 1 tsp oil – add 1 tsp urad dal, 1 tsp chana dal.
-
Saute until golden. Transfer to a plate and set aside.
-
To the same pan add 8-10 nos small onion, 3 nos garlic and 2 nos green chillies.
-
Add around 2 cups mint leaves(cleaned and rinsed).
-
Saute until it shrinks just for few seconds.
-
Now add 2 tbsp coconut and 1/2 tsp tamarind
-
Give a quick saute and switch off.
-
Transfer to a plate and set aside to cool down.
-
Now transfer this to a mixer jar along with required salt and water.
-
Grind it to a chutney consistency.
-
Add water little by little and grind so that it the chutney does not become watery.
-
To prepare tadka : Heat 2 tsp oil add mustard seeds let it crackle then add curry leaves and switch off. Let it splutter then remove.
-
Add tadka to chutney
-
Mix well. Pudina Chutney ready.
-
Serve Pudina Chutney with idli or dosa and enjoy.
Notes
- Make sure to use fresh mint leaves for a vibrant green color chutney. First pluck the leaves from the stem, rinse well then use it.
- While storing do not rinse and store, just pluck from the stem and store it to avoid spoiling. While using you can take the leaves rinse and use it.
- After adding mint leaves do not cook for more time it may change the color and will give a dull looking chutney.
- Tamarind is added as a balance if you do not like then you can skip it.
Mint Chutney Recipe Step by Step
1.Heat 1 tsp oil – add 1 tsp urad dal, 1 tsp chana dal.

2.Saute until golden. Transfer to a plate and set aside.

3.To the same pan add 8-10 nos small onion, 3 nos garlic and 2 nos green chillies.

4.Add around 2 cups mint leaves(cleaned and rinsed).

5.Saute until it shrinks just for few seconds.

6.Now add 2 tbsp coconut and 1/2 tsp tamarind.

7.Give a quick saute and switch off.

8.Transfer to a plate and set aside to cool down.

9.Now transfer this to a mixer jar along with required salt and water.

10.Grind it to a chutney consistency.

11.Add water little by little and grind so that it the chutney does not become watery.

12.To prepare tadka : Heat 2 tsp oil add mustard seeds let it crackle then add curry leaves and switch off. Let it splutter then remove.

13.Add tadka to chutney.

14.Mix well. Pudina Chutney ready.

Serve Pudina Chutney with idli or dosa and enjoy.

Expert Tips
- Make sure to use fresh mint leaves for a vibrant green color chutney. First pluck the leaves from the stem, rinse well then use it.
- While storing do not rinse and store, just pluck from the stem and store it to avoid spoiling. While using you can take the leaves rinse and use it.
- After adding mint leaves do not cook for more time it may change the color and will give a dull looking chutney.
- Tamarind is added as a balance if you do not like then you can skip it.
Variations
- You can make this chutney without coconut too : In that case add 1 tbsp chana dal and urad dal each and add 1 medium sized tomato. Add finely chopped tomato along with onion tomato and saute well until raw smell leaves then proceed with other ingredients.
- If you like garlic flavour then add 5 cloves of garlic.
Storing and Serving Suggestion
Mint or Pudina Chutney can be made ahead and stored but the color of the chutney changes after sometime dur to oxidation. As it has coconut I would recommend storing the leaftovers in fridge and use. This chutney keeps well in room temperature for a day only.
You can serve this chutney along with Idli, dosa, pongal, vada, oothapam etc.
FAQs
1.What is Pudina Chutney?
Pudina Chutney is a flavourful and aromatic chutney made with mint leaves, onion, garlic, greenchillies, coconut etc. Pudina Chutney is a great sidedish with idli, dosa, uttapam etc. Mint Chutney or Pudina Chutney can be served along with snacks like bajji, bonda too.
2.Is Pudina Chutney healthy?
Mint leaves has a lot of health benefits so including it in our daily diet is essential for a healthy lifestyle.
3.What can we eat with Pudina Chutney?
Pudina Chutney can be served along with idli, dosa, upma, uttapam, pongal etc. Mint Chutney serves as a great sidedish with snacks like bonda, bajji too.
4.How to retain the green color in Pudina Chutney?
To retain the vibrant green color do not saute mint leaves for more time, this will retain the green color.

The post Pudina Chutney | Mint Chutney appeared first on Sharmis Passions.
from Sharmis Passions https://ift.tt/4XitsK2
via KITCHEN MASALA


No comments:
Post a Comment