Wednesday, May 5, 2021

Nombu Kanji, veg nonbu kanji coconut milk

Nombu kanji recipe, veg version of Ramadan nombu kanji, a south Indian porridge with goodness of coconut milk, moong dal to heal your tummy.

warm serving of porridge
[feast_advanced_jump_to]

I once tasted veg nombu kanji in one of my uncle’s house. When I posted my oats Kanji I shared in it as well. Especially with fennel seeds in it, it was very very flavorful,.

In other words, perfect balance of flavors and taste, that I could not even forget now. Similarly, I love poondu kanji or vendhaya kanji that we make often. But this style is very new to me.

Wanted to post for a long time, by saying so, I really mean it. As soon as I posted my oats kanji, I thought I should try Ramzan nombu kanji too and post it. But wanted a good authentic recipe.

I read few articles in news papers about the recipe. I realized, there are a handful of versions as well as it differs in each region, each place they make.

veg nombu kanji

Few months back, that is last December, when the weather was cold, I was craving all of a sudden for this nombu kanji. Therefore I asked few people in my whatsapp, friends and relatives.

Once my relative shared this recipe and asked me to try. Worst of all, I lost the recipe, it was few years back actually. So I went back to her shamelessly and asked the recipe again. She is sweet enough to send it right away.

๐ŸŽฅ Video

Is video more your thing? Watch the recipe

Before I made this, I tried another version also which almost tasted like porridge version of biryani and not at all same as I tasted in my childhood. After that, never had courage to try again and get an un expected result.

I know the one I tasted there had fennel seeds / soambu in it. I love the flavor it lends to kurma, biryani (south Indian way) and other few recipes. This kanji too.

Problem is Vj hates it like anything. For a person who isn’t demanding at all for the options, I did not want to disappoint him because I planned this for a breakfast as I prepare for the blog post.

Did not want to miss the fennel seeds flavor as well. So added in powdered form. I won’t say I could recreate the same I tasted, but was super delicious and flavorful. Definitely not a kanji form of biryani, no. So we both had it heartily.

๐Ÿงพ Nombu kanji benefits

With coconut milk and moong dal in this porridge, it is really good to soothe a tummy that’s fasting for the whole day. Coconut milk helps in preventing or treating ulcer/ mouth ulcer.

So this comes as a rescue to those who are fasting. They use this kanji to break their fast.

Apart from this, the concept behind nombu kanji is, palli vaasal preparing it in bulk everyday. They serve it for free to all in the area who visits the mosque or pass by. Just like prasadam serving the purpose of feeding poor people apart from the sacred food offerings concept.

๐Ÿ“– Variations

  • Swap coconut milk with grated coconut.
  • The rice we use can be varied. I used seeraga samba rice. You can use raw rice varieties like Sona masuri. I have seen in an article that they use broken rice.
  • The moong dal amount can be varied. I used 2 tbsp in my recipe actually. This makes the kanji thicker as it gets mashed and as it cools, it makes the kanji even more thicker, creamier.
  • Want to make it more nutritious? Use green gram dal (broken).
  • Use toor dal in place of moong dal.
  • Sprinkle little garam masala or biryani masala for extra flavor.

๐Ÿฅฅ Coconut milk

I used around 1 & ½ cups of fresh grated coconut to extract coconut milk. First grind grated coconut with ½ cup luke warm water and squeeze the milk out. Keep a metal strainer over a bowl and squeeze the coconut milk. Repeat one more time to get coconut milk needed for the recipe.

You can also use store bought coconut milk, but I prefer fresh ones. It feels light as well as no preservatives, stabilizers.

๐Ÿ“‹ You may also like

If you had tried this recipe, let me know your feedback in comments section.

warm serving of porridge
Print Pin
No ratings yet

Nombu kanji recipe

Nombu kanji recipe, veg version of Ramadan nombu kanji, a south Indian porridge with goodness of coconut milk, moong dal to heal our tummy.
Course Main Course
Cuisine Indian
Prep Time 10 minutes
Cook Time 20 minutes
Servings 4
Cup measurements

Ingredients

  • ½ cup Raw rice or seeraga samba rice
  • 2 tbsp moong dal
  • 1 cup coconut milk
  • 1 Onion
  • 1 Tomato
  • ¼ cup carrot beans
  • 1 tbsp ginger garlic paste
  • 8 Mint leaves
  • 2 tbsp Coriander leaves chopped
  • ½ tsp Red chilli powder
  • 1 Green chilli
  • 1 & ½ cup water for cooking
  • 2 cups water later
  • Salt as needed
  • To temper
  • 1 tbsp oil
  • 1 inch Cinnamon
  • 1 Cardamom

Instructions

  • Heat a pressure cooker with oil. Temper with cinnamon, cardamom.
  • Add onion and fry till onion turns soft.
  • Tip in the ginger garlic paste. In goes tomato, vegetables.
  • Saute for couple of minutes. Add 1 & ½ cups water, washed rice and dal.
  • Mix well and bring to boil. Pressure cook for 4 whistles in medium flame.
  • Once done, mash it well. Add 1 & ½ to 2 cups more water. Mix well.
  • Bring to boil and simmer the flame. Add the coconut milk.

Notes

  • Instead of coconut milk, you can use grated coconut. ½ cup to  1 cup fresh grated coconut.
  • You can increase moong dal more.

๐Ÿ“ธ Step by step photos

1. Wash rice and dal, keep aside. Heat a pressure cooker with oil. Temper with cinnamon, cardamom.

washed, temper

2. Add onion and fry till onion turns soft.

3. Tip in the ginger garlic paste. In goes tomato, vegetables. Saute for couple of minutes.

4. Add 1 & ½ cups water, washed rice and dal. Mix well and bring to boil.

add water

5. Pressure cook for 4 whistles in medium flame.

cooked

6. Once done, mash it well. Add 1 & ½ to 2 cups more water. Mix well.

add water

7. Bring to boil and simmer the flame. Add the coconut milk. Stir well and simmer for a minute. Switch off the heat when it just starts to boil.

nombu kanji ready

Enjoy it warm the best. Since nombu kanji has coconut milk, please consume within 5-6 hours. You can refrigerate and consume if you know you can’t finish the same day. But refrigerate as soon as it is cooled.

ramadan-nombu-kanji

The post Nombu Kanji, veg nonbu kanji coconut milk appeared first on Raks Kitchen.


from Raks Kitchen https://ift.tt/3tjhWY9
via KITCHEN MASALA

Monday, May 3, 2021

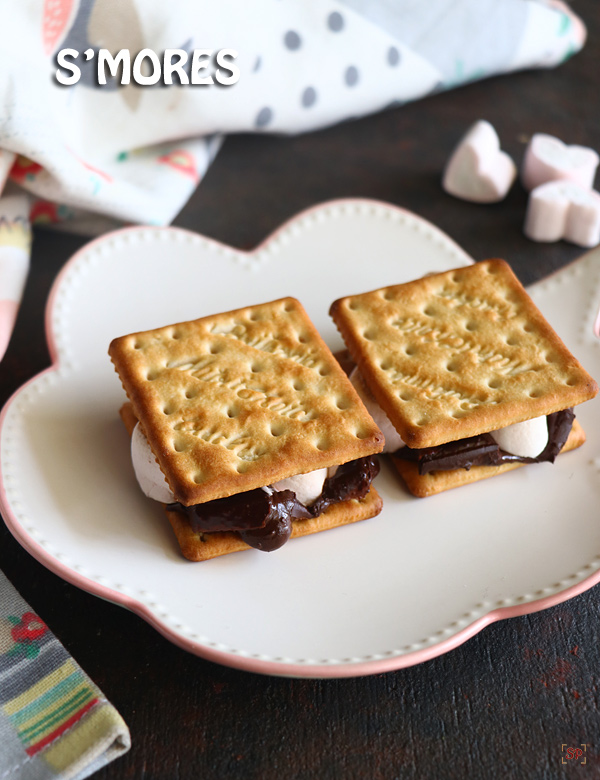
Easy S’mores Recipe

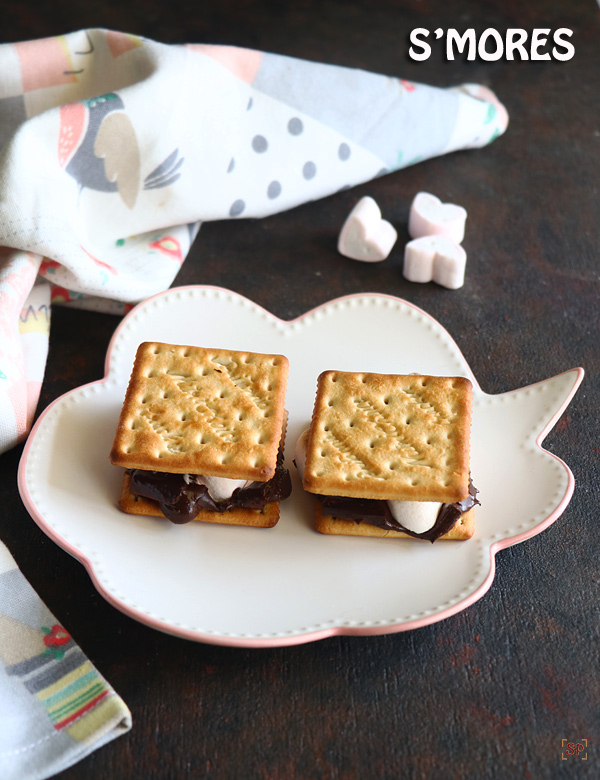
S’mores a traditional campfire confection made with crackers, marshmallows and chocolate.

Smores Recipe

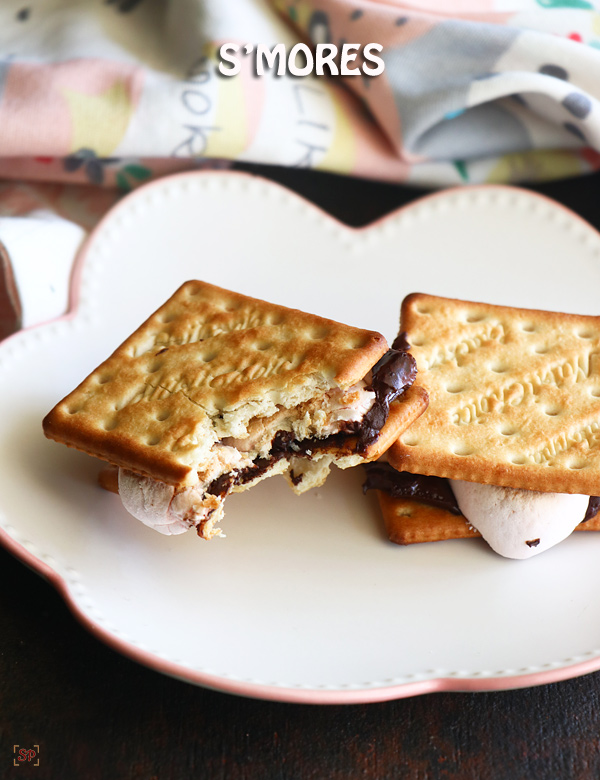
S’mores recipe with step by step pictures and video.  S’mores are toasted chocolate and marshmallows sandwiched between 2 crackers.

S’more is an abbreviated word for ‘Some more‘. As its so tasty its asked for more and more. It is fun to make with kids nad popularly known as marshmallow sandwich. As s’mores are cooked and assembled in open campfire it is mostly associated with scouts.

I made a small batch of s’mores just for kids as I am not fond of it. So made just 2 in baked and another 2 in stove top versions. And when I asked them which tastes better they weren’t able to judge, I understand how can chocolate and marshmallows combo go wrong?

About S’mores Recipe:

S’mores is a traditional campfire confection made  by sandwiching toasted chocolate and marshmallows inbetween crackers. They can either be baked or made in stove top.

Baked version: To begin with first line parchment paper on a baking tray. Place the crackers  on the tray. Place the chocolate and marshmallows on it. I wanted to recreate the toasted charred effect we get in open fire so grilled it. Grill in preheated oven for the mentioned timing, keep an eye. At this time the marshmallows and chocolate will be goey so remove the tray. Immediately seal with another cracker. Press slightly and serve!

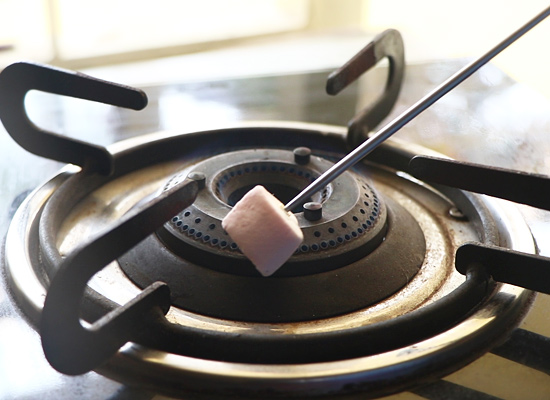
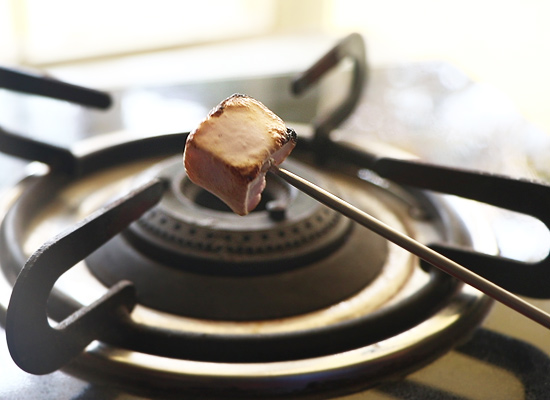
Stove top version: Usually smores are made in campfire. The marshmallows are toasted in open campfire. This is an easy method for those who don’t own a oven. But in this method we need to be very careful as marshmallows gets burnt easily. First assemble the crackers over a tray, add the chocolate and keep it ready. Switch on the stove simmer the flame, prick the marshmallows in a long stick and slightly show them on and off. Once it is charred on most sides, remove using a form and place it on the cracker. Repeat to finish. Immediatel seal with another cracker and serve.

Variations:

  • There are many variations you can make to this classic smores recipe, you can add nuts, dry fruits.
  • You can even add a mix of milk and white chocolate. I have used dark chocolate here.
  • You can even use homemade chocolate bark.
  • We don’t get graham crackers here so I replace it with salted crackers we get here easily. You can even use regular multigrain cookies.

Serving and Storage:

  • You can serve it with a cup of milk. It tastes best even when had as such.
  • This keeps well in in room temperature for 1 day. Refrigerate for extending shelf life for upto a week. You don;t need to freeze, just refrigeration is enough. While serving microwave for few seconds and serve it. However tastes best when consumed fresh.

More related recipes:

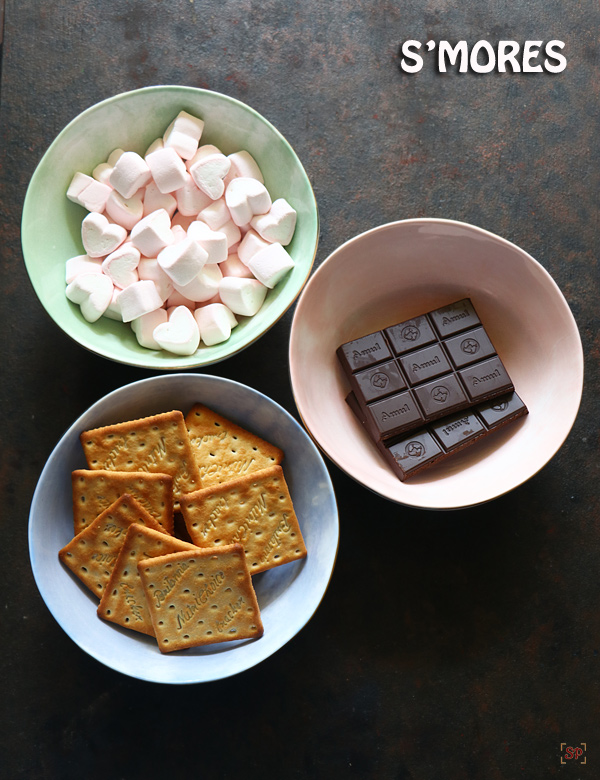
Smores recipe ingredients smores

Smores Recipe
Print

S'mores recipe

S'mores a traditional campfire confection made with graham crackers, marshmallows, and chocolate.
Course Dessert, Snack
Cuisine American
Prep Time 5 minutes
Cook Time 5 minutes
Total Time 10 minutes
Servings 2
Calories
Author Sharmilee J

Ingredients

  • 8 nos Crackers
  • 12 small bars dark chocolate
  • 12 nos small marshmallows

Instructions

Step by step method to make Baked S'mores:

  • Line a parchment paper on a baking tray. Place the crackers. Meanwhile preheat oven at 175 deg C for 10 mins.
  • Place the  dark chocolate bars.
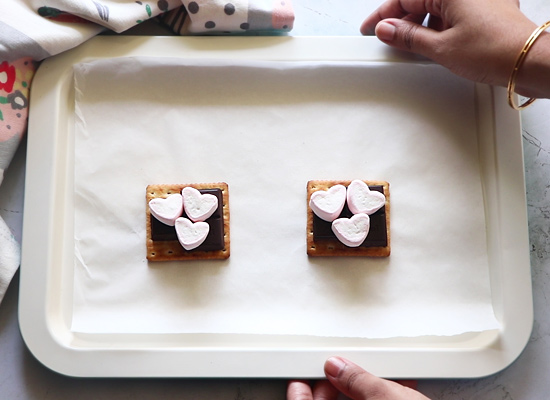
  • Place the marshmallows. Make sure there is enough space for it to bloom while baking otherwise it will overflow.
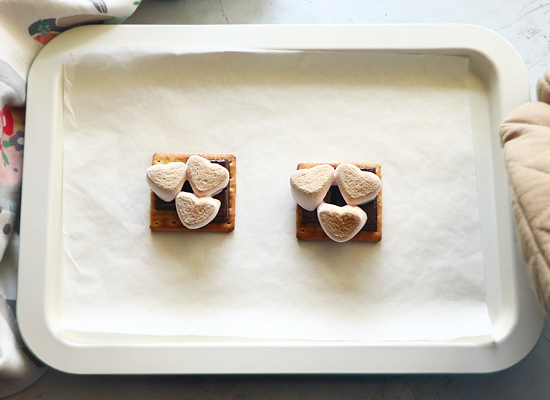
  • Now the crackers are assembled. So ready to bake. If you want even browning on top then place the tray on top rack. Change the mode to grill. Grill in preheated oven at 175 deg C for 3-5 mins but keep an eye.
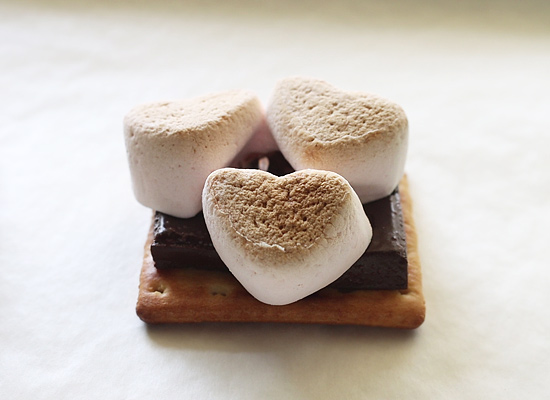
  • Keep an eye and when the marshmallows are bloomed and starts to brown on top, remove the tray.
  • I placed the tray in top rack and baked for 4 mins but was standing near the oven itself.
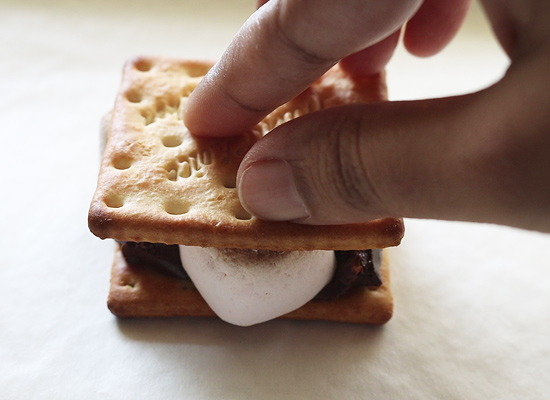
  • Immediately remove from oven, seal with another cracker, press slightly. Now your baked s'mores is ready to serve!

Step by step method to make Stove top S'mores:

  • First to begin with assemble the cracker, place chocolate on it and keep it ready.
  • Prick the marchmallow using a long stick. I used my paniyaram turner. Switch on the flame, simmer it completely. Show the marshmallows in flame directly but make sure to take it on and off. Do not keep it for more than half a second as it might burn.
  • When it charred on almost all side remove.Repeat to finish.
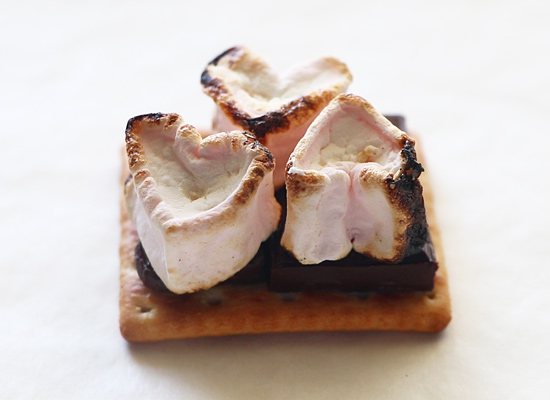
  • Place the toasted marshmallows on the chocolate.
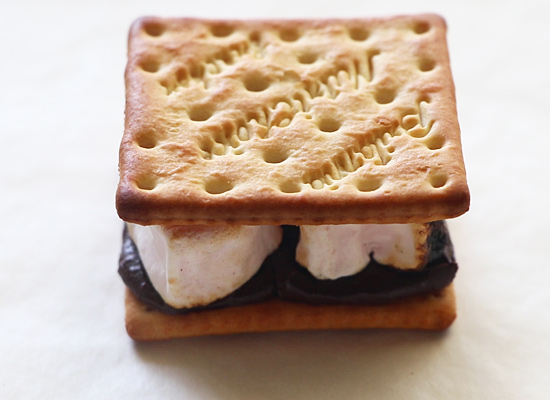
  • Seal with another cracker and Serve. Repeat to finish.
  • Enjoy!

Video

Notes

  • If you do not want browning then use bake mode and bake in same temperature until the marshamallows are puffy and bloomed. But I prefer to grill it for the toasted tasted and texture we get in open fire.
  • You can make a big batch and store it.
  • If you get graham crackers use it.

If you have any more questions about this  s’mores recipe do mail me at sharmispassions@gmail.com. In addition, follow me on InstagramFacebookPinterest ,Youtube and Twitter .

Tried this eass’mores recipe ? Do let me know how you liked it. Also tag us on Instagram @sharmispassions and hash tag it on #sharmispassions.

Step by step method to make Baked S’mores:

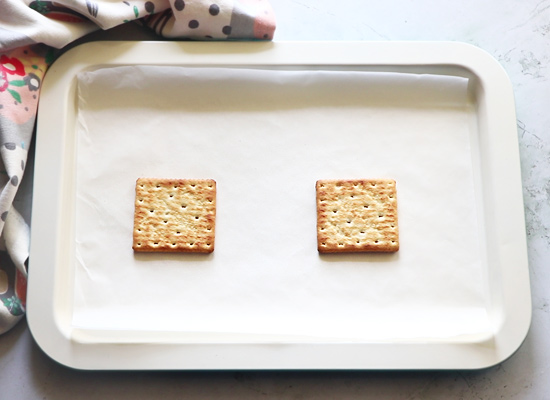
1.Line a parchment paper on a baking tray. Place the crackers. Meanwhile preheat oven at 175 deg C for 10 mins.

arrange crackers

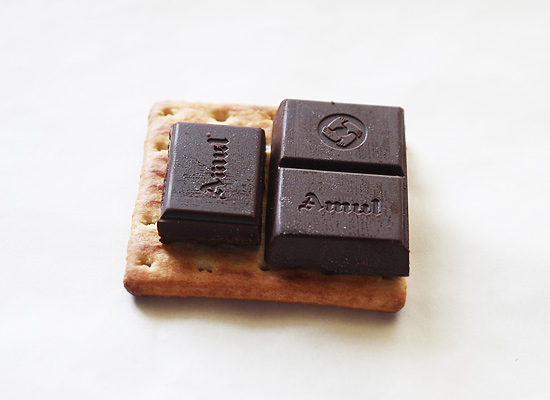
2.Place the  dark chocolate bars.

keep chocolate

3.Place the marshmallows. Make sure there is enough space for it to bloom while baking otherwise it will overflow.keep marshmallows

4.Now the crackers are assembled. So ready to bake. If you want even browning on top then place the tray on top rack. Change the mode to grill. Grill in preheated oven at 175 deg C for 3-5 mins but keep an eye.all set to bake

5.Keep an eye and when the marshmallows are bloomed and starts to brown on top, remove the tray.baked smores ready

6.I placed the tray in top rack and baked for 4 mins but was standing near the oven itself.toasted smores

7.Immediately remove from oven, seal with another cracker, press slightly. Now your baked s’mores is ready to serve!seal with another cracker

Step by step method to make Stove top S’mores:

1.First to begin with assemble the cracker, place chocolate on it and keep it ready.keep chocolate

2.Prick the marchmallow using a long stick. I used my paniyaram turner. Switch on the flame, simmer it completely. Show the marshmallows in flame directly but make sure to take it on and off. Do not keep it for more than half a second as it might burn.

toast in open fire

3.When it charred on almost all side remove.Repeat to finish.

toast in open fire

4.Place the toasted marshmallows on the chocolate.smores

5.Seal with another cracker and Serve. Repeat to finish.seal with another crackers

Enjoy!Smores Recipe

My tips while making S’mores Recipe:

  • If you do not want browning then use bake mode and bake in same temperature until the marshamallows are puffy and bloomed. But I prefer to grill it for the toasted tasted and texture we get in open fire.
  • You can make a big batch and store it.
  • Traditionally graham crackers are used but I have replaced it with nutrichoice crackers.

Smores recipe

The post Easy S’mores Recipe appeared first on Sharmis Passions.


from Sharmis Passions https://ift.tt/3eaLtin
via KITCHEN MASALA

Mango jaggery lemonade recipe, Mango Panagam

Mango jaggery lemonade, mango juice drink in panagam style. Try this drink with the goodness of jaggery this summer. Quick video, stepwise photos.

mango-jaggery-lemonade
[feast_advanced_jump_to]

Remember my last week’s post? When I made puree for the recipe, I had some leftovers. I also had some panagam left over when I shot the recipe.

After finishing shoot, I was so thirsty and thought of having panagam. Then I remembered the puree left over. Thus this idea flashed to mix both and have it.

It was so so yummy with jaggery and panagam’s flavor. I thought I should definitely post this in my blog and made again to share here and enjoy one more time in name of posting.

mango-panagam

๐Ÿฅ˜ Ingredients

I used alphonso mango, it’s best for the vibrant color. Mine is organic mangoes, so it was smaller in size. You can make use of not so sweet mangoes too, to finish it off.

The jaggery powder I used was also organic. If you are using solid form, make sure to powder or grate for dissolving easily.

๐Ÿ’ญ Top tip

According to the mango size, it’s sweetness, jaggery’s sweetness, for example achu vellam, urundai vellam and regular powdered jaggery, each has it’s own level.

Different from the organic jaggery powder. So keeping this post as an idea, try to balance the taste by adjusting the ingredients.

The consistency of the drink also can be made thin by adding one more lemon’s juice and adding more sweetness accordingly.

๐Ÿ“– Variations

I made it desi version by adding jaggery and the flavoring items like cardamom, nutmeg and edible camphor. You can miss one or two and make the same.

Sugar also can be used in place of jaggery. Sugar’s sweetness is more than jaggery’s. So adjust accordingly.

๐Ÿ‘ช Serving size

You can easily double or make it in bulk by adjusting the ingredients. Please use the serving adjuster inside my recipe box.

Can be refrigerated and served comfortably within a day or two. I would not suggest to keep more than that in fridge and consume.

๐ŸŽฅ Video

Is video more your thing, you can watch a short video here in my Youtube channel.

๐Ÿ“‹ You may also like

mango-panagam
Print Pin
No ratings yet

Mango jaggery lemonade | Mango panagam

Mango jaggery lemonade, mango juice drink in panagam style. Try this drink with the goodness of jaggery this summer. Quick video, stepwise photos.
Course Drinks
Cuisine Indian
Prep Time 10 minutes
Cook Time 0 minutes
Servings 2

Equipments (Amazon Affiliate links)

Cup measurements

Ingredients

  • 1 Alphonso mango Ripe
  • 1 Lemon Indian variety
  • ¼ cup Jaggerry powdered
  • 1 Cardamom
  • 1 pinch Nutmeg
  • 1 Pinch Edible camphor Optional
  • 1 Pinch Salt

Instructions

  • Scoop out the pulp from mango. Place it in a blender.
  • I add jaggery, cardamom, nutmeg while blending itself as it easily mixes. Grind smoothly.
  • Place the ground pulp in a mixing jug. Add 2 cups water plus as needed. Tip in some salt.
  • Squeeze lemon in it and mix well using a whisk.
  • It may look as if it is not smooth initially, but mixing with whisk helps. It’s ready to serve.

Video

Notes

  • Adjust sweet according to your need. It should taste sweet more, with a tangy taste.
  • Adding salt really prevents the drink from tasting flat. So do not skip it.

๐Ÿ“ธ Step by step photos

1. Scoop out the pulp from mango. Place it in a blender.

scoop

2. I add jaggery, cardamom, nutmeg while blending itself as it easily mixes. Grind smoothly. Place the ground pulp in a mixing jug. Add 2 cups water plus as needed.

blend

4. Squeeze lemon in it, tip in little salt.

Squeeze lemon

5. Mix well using a whisk.It may look as if it is not smooth initially, but mixing with whisk helps. It’s ready to serve. It may look as if it is not smooth initially, but mixing with whisk helps. It’s ready to serve.

ready to serve

Mango jaggery lemonade or mango panagam is ready to enjoy. I use I cold water while mixing itself, so that I can immediately enjoy. Otherwise keep refrigerated for 30-45 mins to make it cold and serve chilled.

The post Mango jaggery lemonade recipe, Mango Panagam appeared first on Raks Kitchen.


from Raks Kitchen https://ift.tt/2RfiZuO
via KITCHEN MASALA

Sunday, May 2, 2021

Easy Sponge Cake Recipe

“Easy Sponge Cake Recipe with step by step pictures. Basic vanilla sponge cake which is made using whipped eggs. This cake is best served as snack cakes or can be made as layer cakes” I was looking for a simple best sponge cake recipe for a while now. Finally a good friend gave me this...

Read More

The post Easy Sponge Cake Recipe appeared first on Yummy Tummy.


from Yummy Tummy https://ift.tt/3u7GWml
via KITCHEN MASALA

Saturday, May 1, 2021

Measuring cups and spoons

Measuring cups and spoons are quite essential for measuring ingredients. Be it for baking or for everyday cooking I used them for measuring dry and wet ingredients. I find it easy and convenient to use cup measures than gram measures for which we need kitchen weighing scale to measure each time.

I had already posted measuring cups and spoons that I was using earlier but those are no longer in use. So this is an an updated post with the new set I am using for the past few years.

Many of you keep requesting to post the measuring cups and spoons I use so thought to make a seperate post, video for it. None of the items mentioned here are sponsored, I have given the links as many kept asking me the whereabouts of it. This is my first voice over video posted in youtube channel, Hope you like it.

All the measuring cups that I am using has 1 CUP measure = 250 ml – Yes I measured each one seperately.

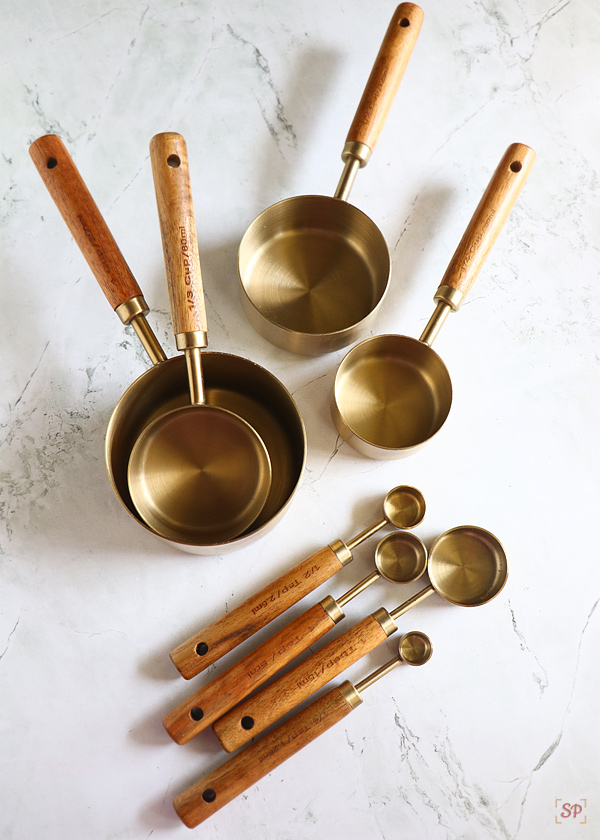
Measuring cups – 1 CUP, 1/2 CUP, 1/3 CUP and 1/4 CUP

Measuring spoons – 1 TBSP, 1 TSP, 1/2 TSP, 1/4 TSP

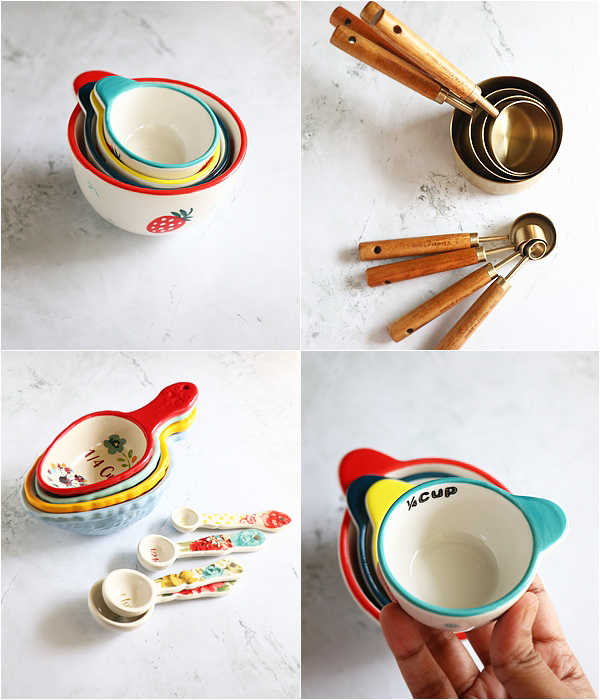
The gold color set of measuring cups and spoons(gold with wooden handle) are from Crate and Barrel US. I have to mention this as my friend Sowmya travelled from her city to another just to buy this. Luckily it was on a sale and it costed me around 1800 Rs. These will always be very special and favorite to me!

These are not brass / bronze as you had asked. It has a gold color satin finish with acacia wooden handle. It has measure markings on the handle. Had been using it for most of my videos and they are very sturdy, the finish is still good as new. But I should admit that I use it only for my videos not for everyday use. I use soft crub to wash it and its handwash only. The only thing I see  now is the markings on the handle have started to fade after several washes.

Measuring Cups

Measuring Spoons

Similar in Amazon

I use these cups and spoons for most of my cooking videos.

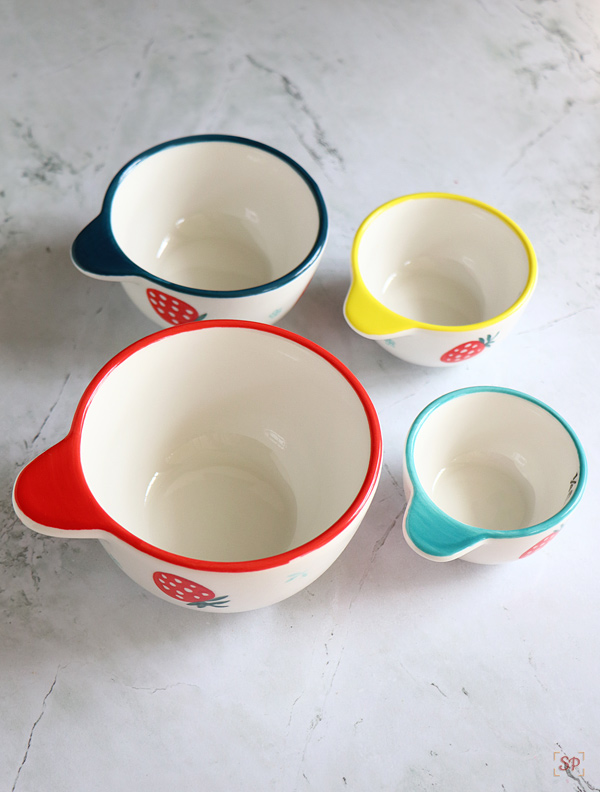
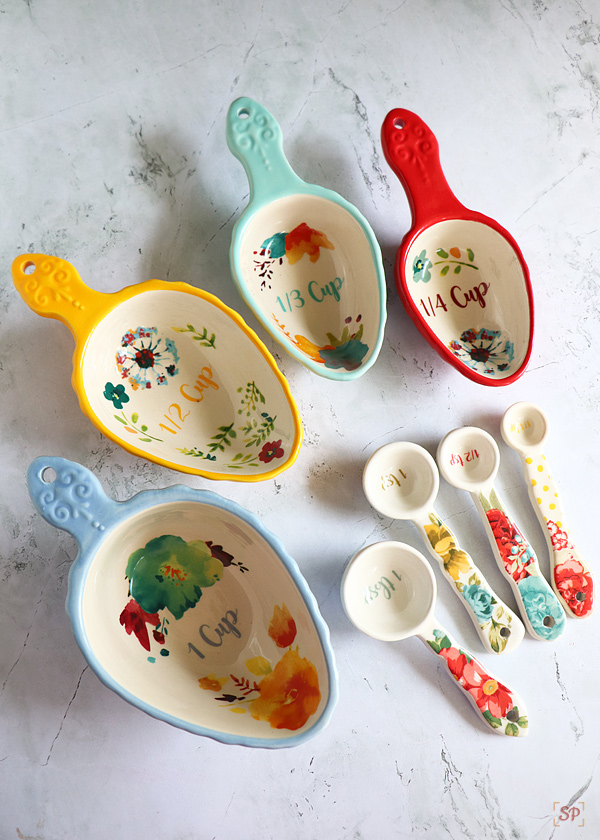
I was looking to show some sort of variation in my baking measures so was looking for ceramic measuring cups and spoons. Previously I was using a plastic one with different colors but it was difficult to measure hot ingredients as hot in plastic is a big no no to me. So thats when I saw these ceramic measuring cups and spoons in Omega exclusive and bought them through whats app for around 740 Rs.

Whats app no : 7338721599

These are very pretty and attractive. It has measure markings printed inside the cups. The main disadvantage is the handle is too small to hold so it might slip and fall when pouring. Also it came only with measuring cups and not spoons. These are dishwasher safe.

I was deperately searching for a ceramic measuring  spoons to match the above one but couldnt find one. So  what I suggest is to buy a complete set of measuring cups and spoons as each cup and spoon measure is different.

When I was searching for a ceramic set found these in desertcart but had no friends travelling down especially at this situation. It was a bit pricey in desertcart so was waiting for a chance to grab it at discount. Luckily there was a millenium offer which saved me from shipping charge so the full set costed me 3200 Rs.

These are actually stoneware and not ceramic. These are dishwasher safe and  very sturdy. And I absolutely love using them.

Pioneer woman measuring set

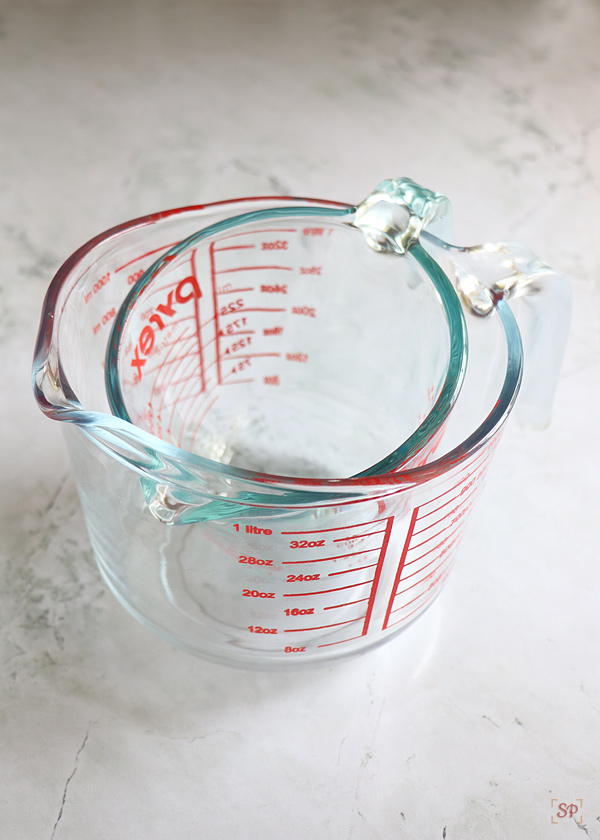
And for liquid measures I use these 2 glass measuring jugs. They are very convenient to use. I use them not only for measuring but for mixing liquids, cake batter, pancake batter etc.

Pyrex 

Incrizma

Hope I have all of your queries answered. Still if you have any queries feel free to comment would be happy to answer.

Also my love for searching and collecting measuring cups and spoons is never ending. I am still searching for a complete wooden set of measuring cups and spoons, hope I will find it soon. ๐Ÿ™‚

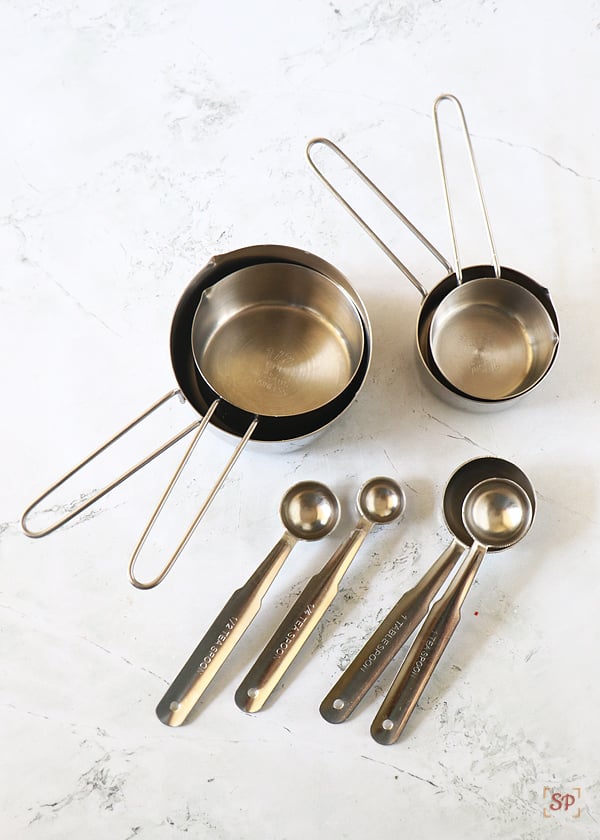
For those of you who had asked if I am using these colorful pretty measuring cups and spoons for my everyday needs  – NO. I use these steel measuring set which my friend bought me years back, yes I am still using it as its sturdy and mainly concenient to use also dishwasher safe which saves my hand work.

Steel measuring cups set 

The post Measuring cups and spoons appeared first on Sharmis Passions.


from Sharmis Passions https://ift.tt/334fGJH
via KITCHEN MASALA